Getting Started
Welcome to the Gateway documentation!
A detailed technical description of the interface can be found in our Reference documentation - but you should read the Transaction Flow chapter first to understand what the different requests are used for.
In case you want to accept card payments, you may want to integrate our payment.js Library for seamless user experience.
Transaction Process
Depending on the payment method and connector configuration there are 4 different types of process flows:
Full-Page Redirect
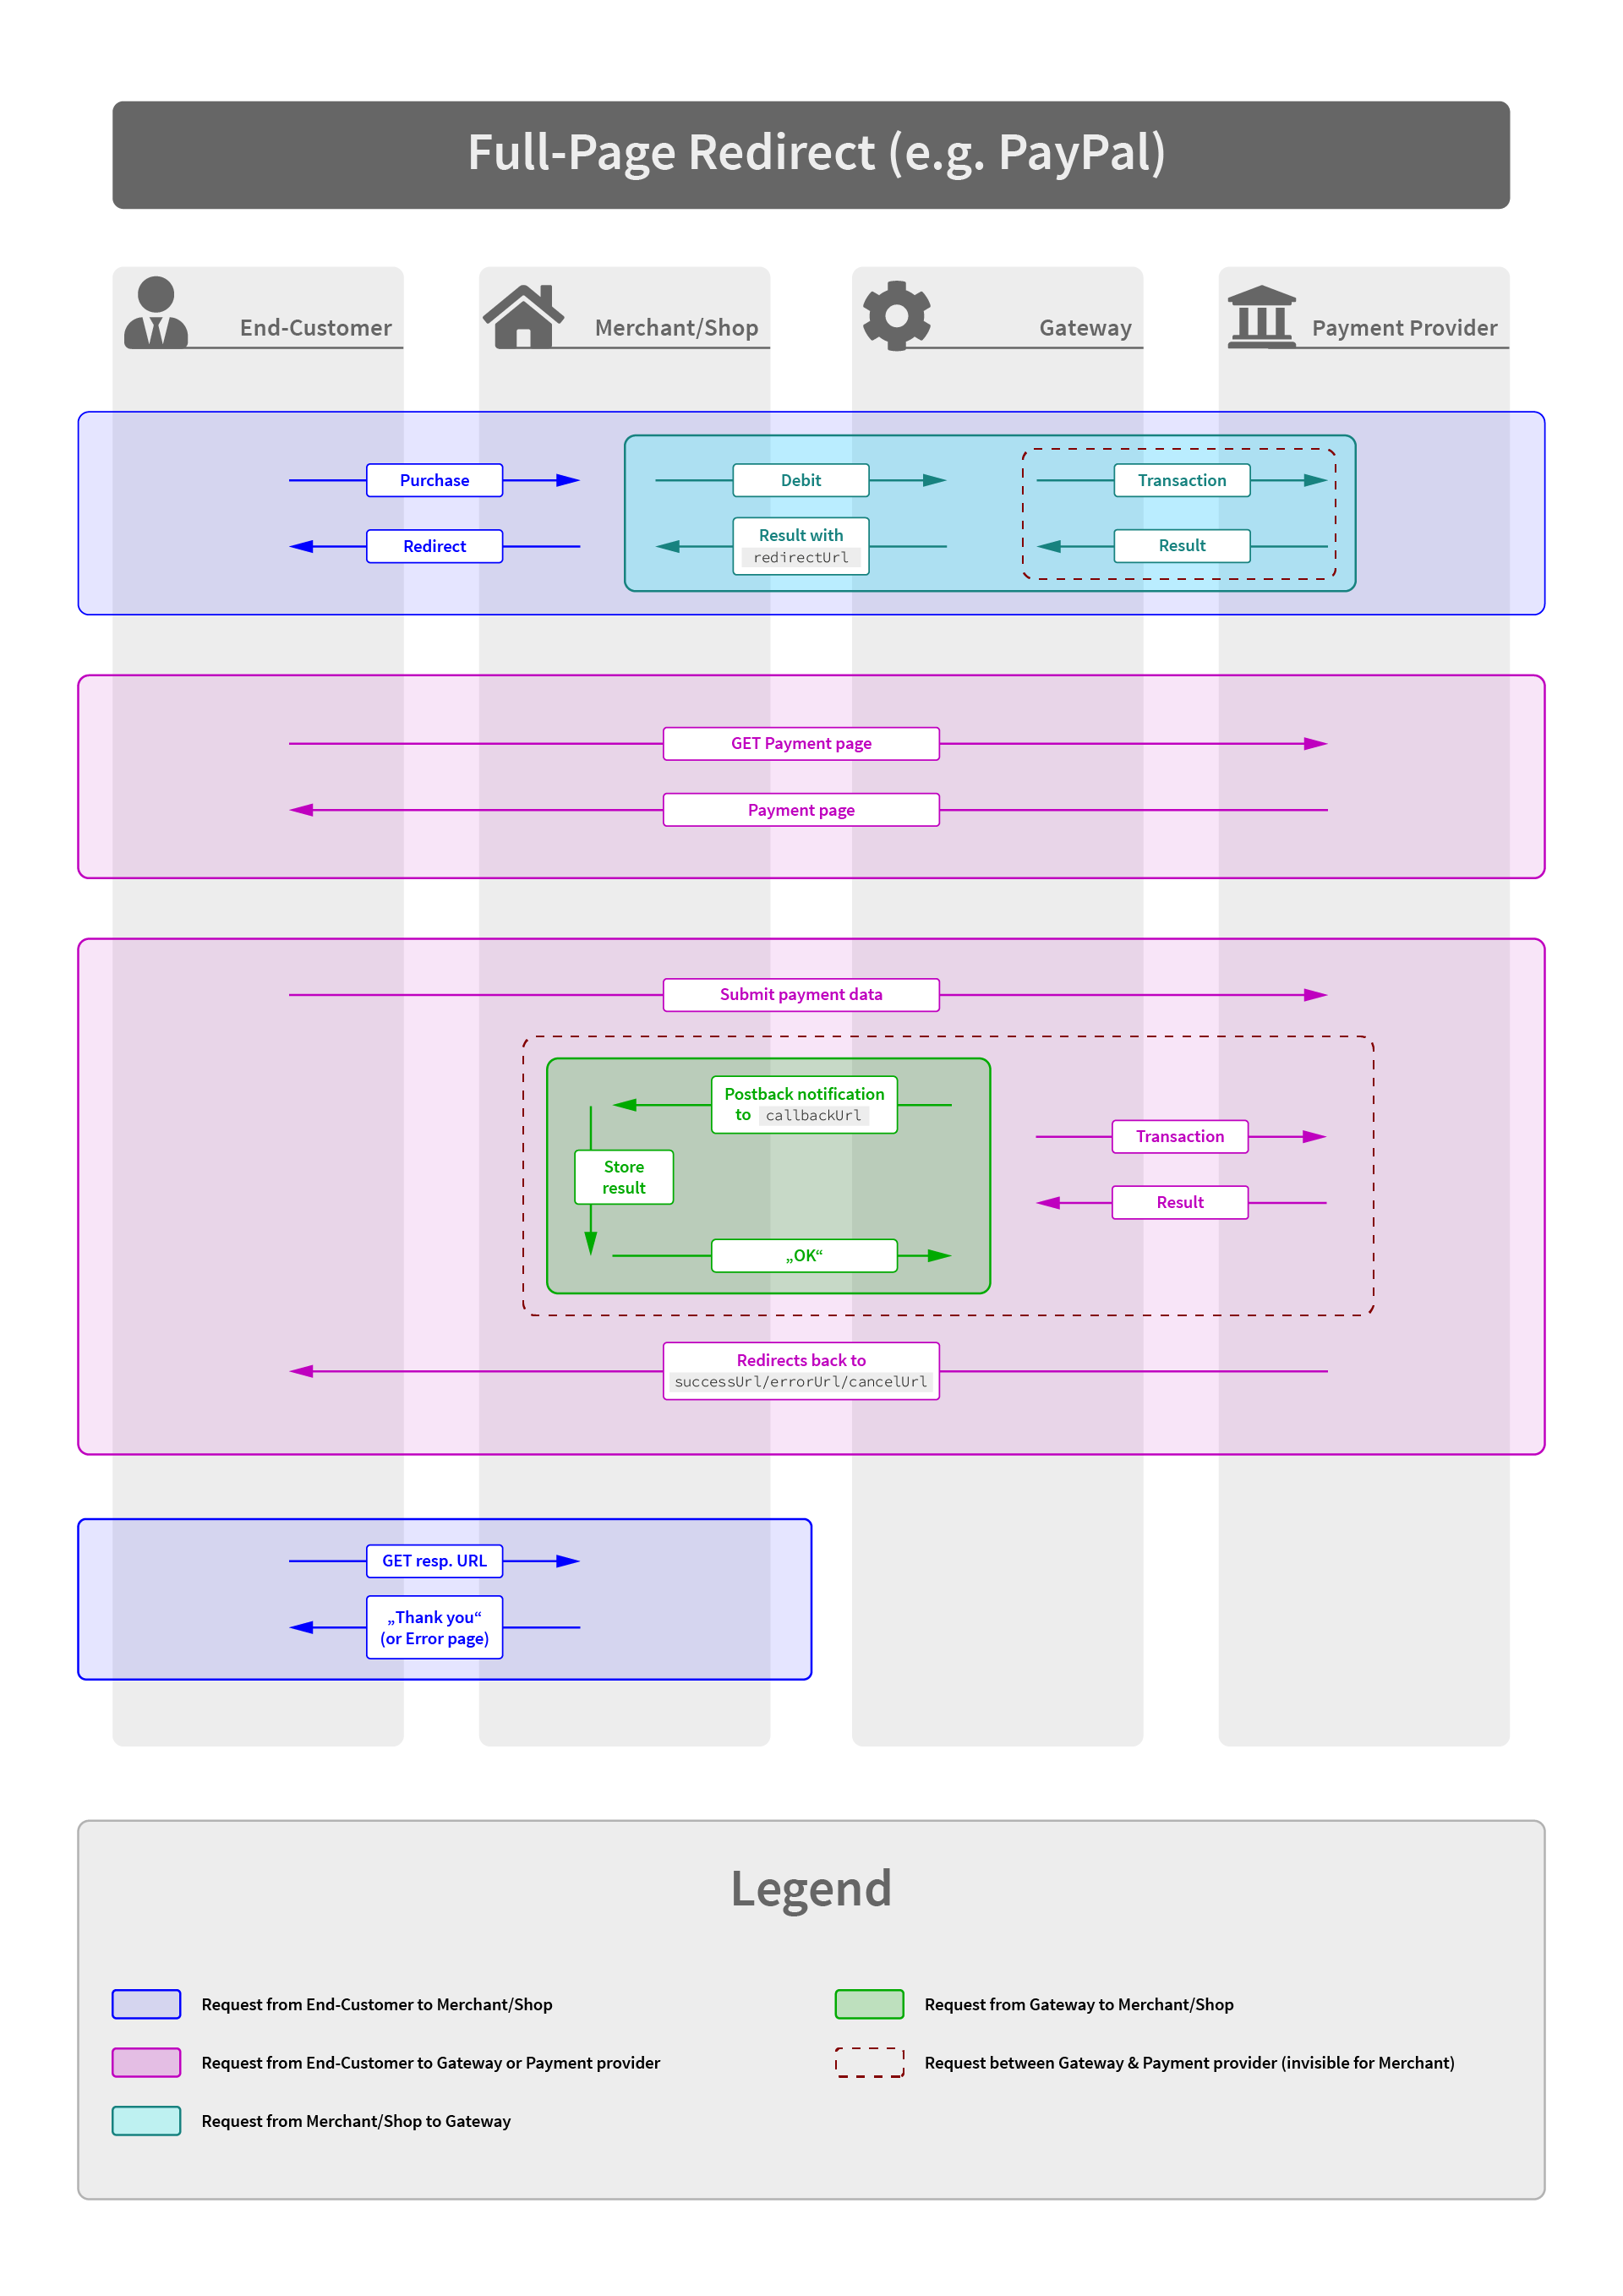
This flow requires you to redirect the end-user to the payment page as advised in the redirectUrl response.
- Initiate the payment with the appropriate API call
- Upon success the Gateway answers with a result containing
returnType = REDIRECTand the url inredirectUrl - You redirect the user to the given URL (usually via a
Locationheader) - The user completes the payment process on the payment page
- The Gateway sends an asynchronous status notification to the URL provided in the initial API call
- The user will be back redirected to the
successUrlorerrorUrl(depending on the result) you provided in the initial API call.
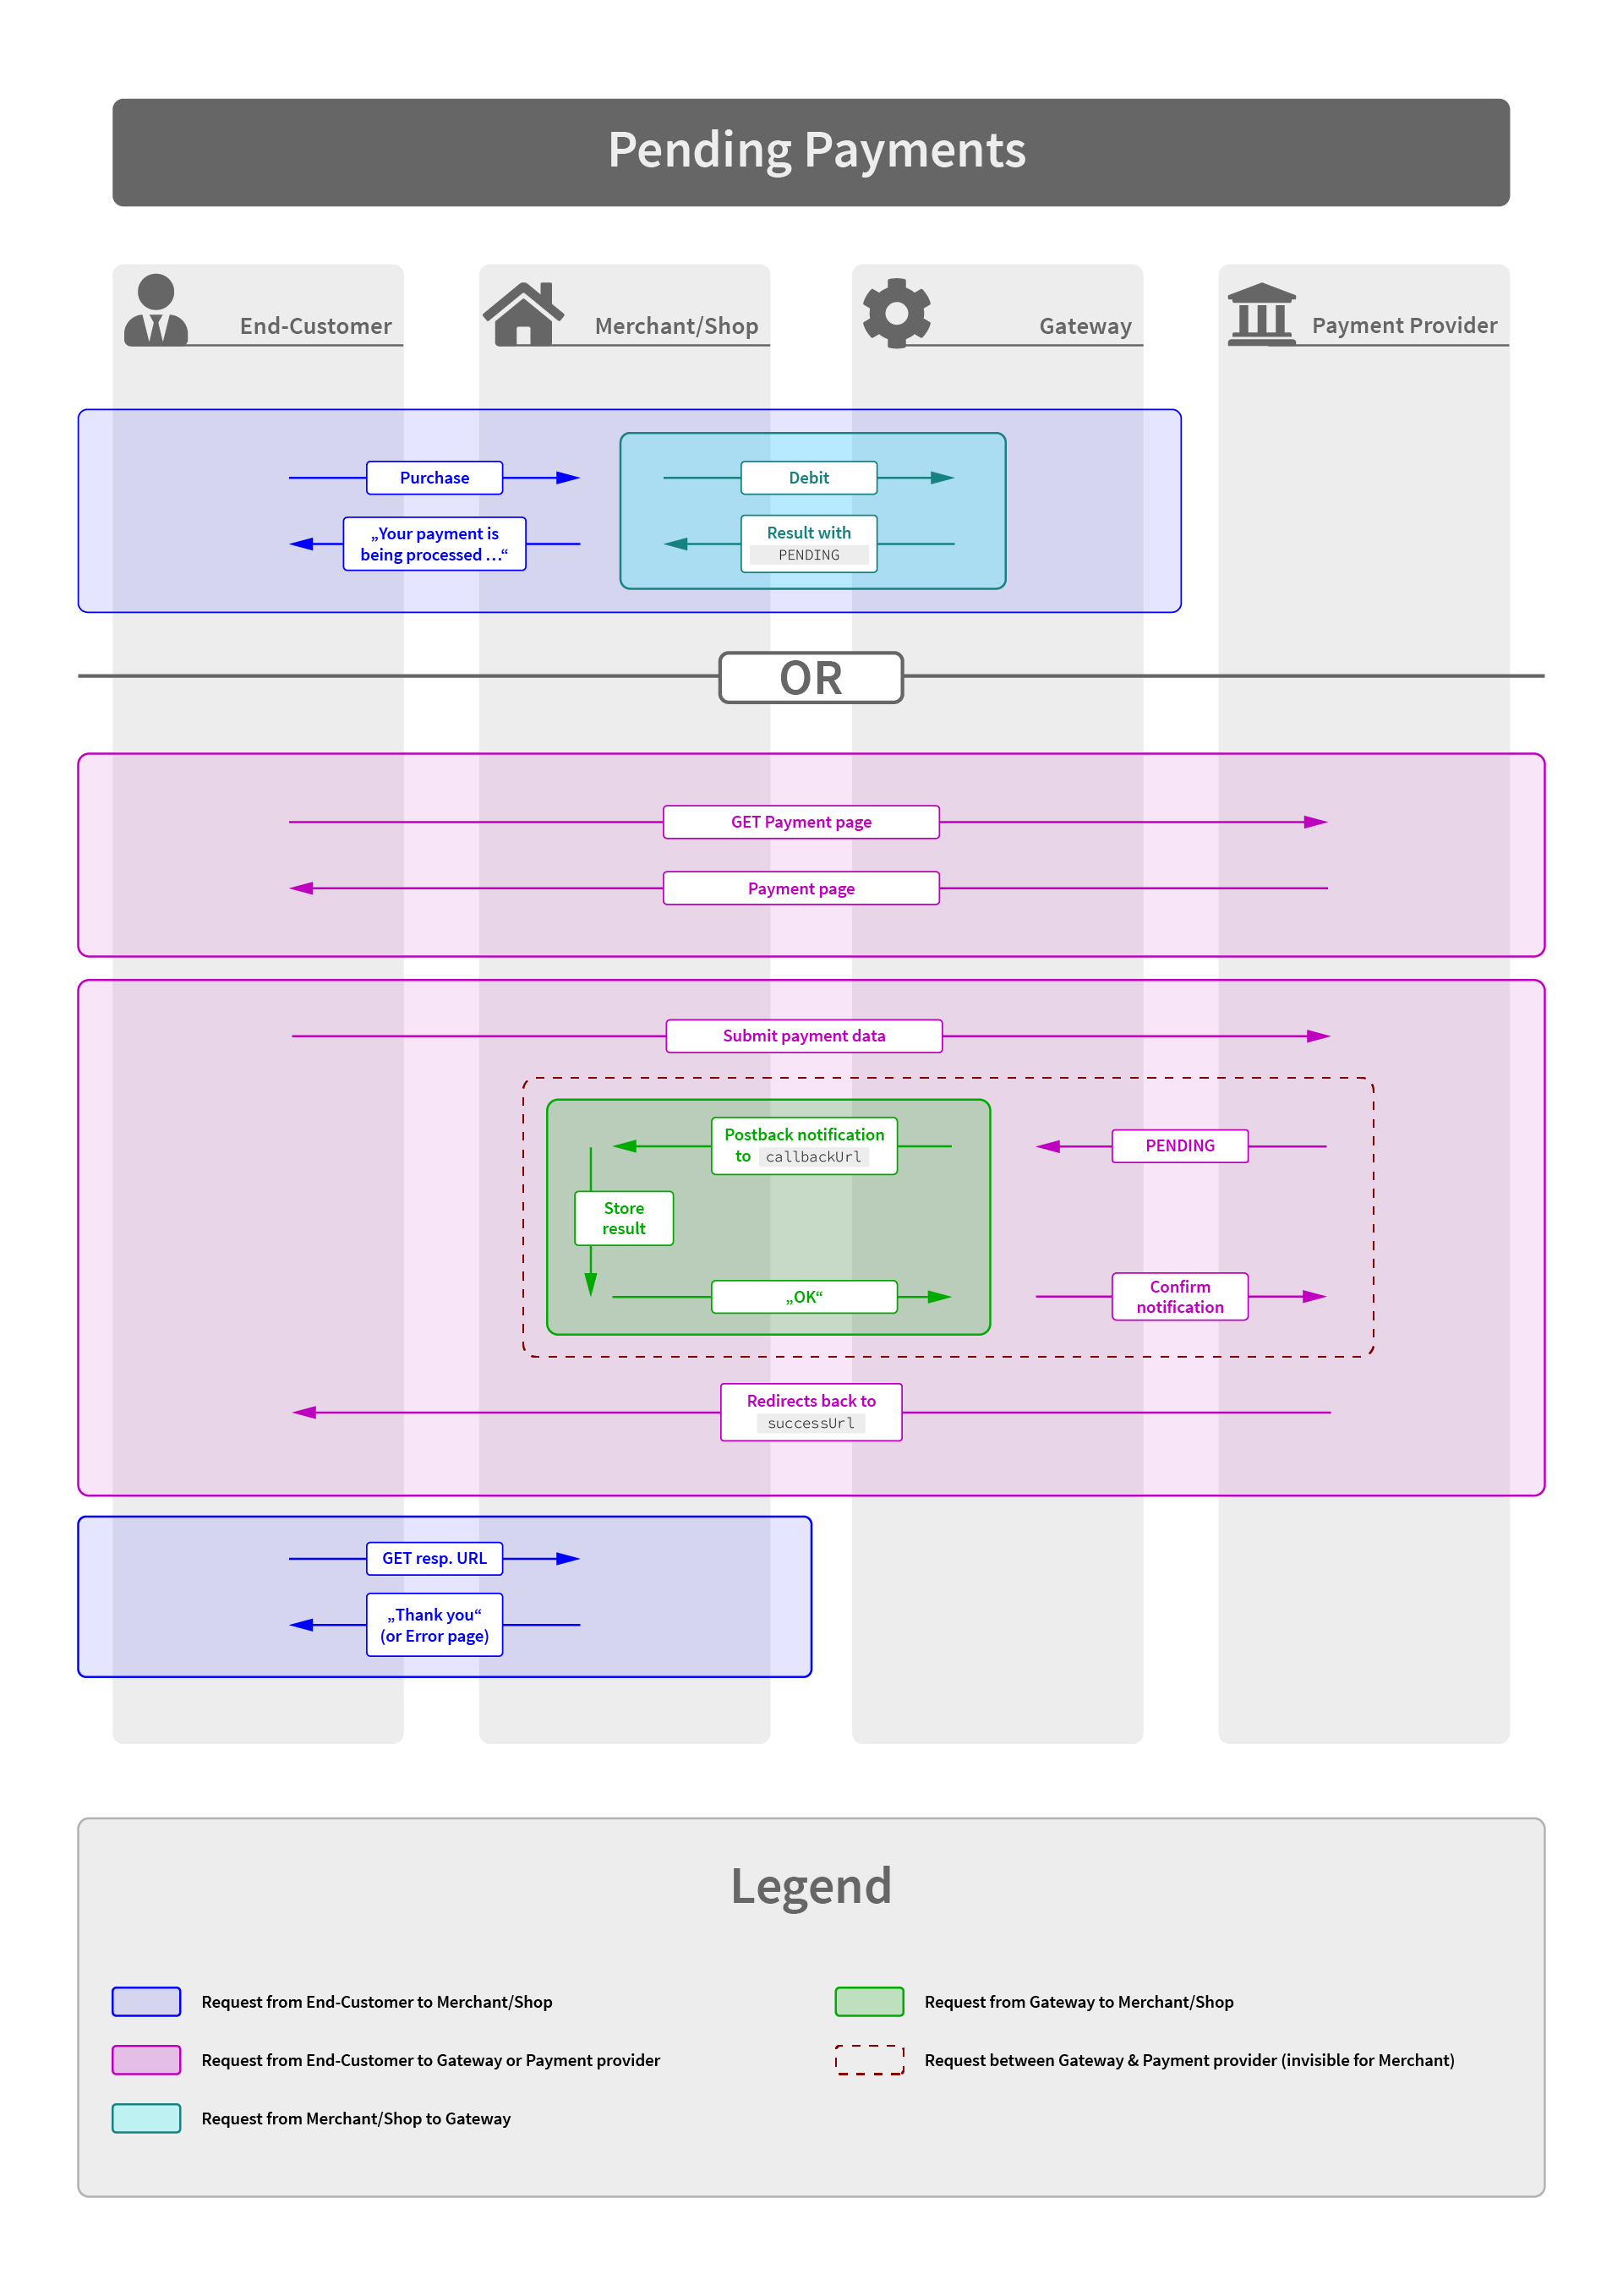
Note: If the payment is in status PENDING the user will still be redirected to the success page.
Hosted Payment Form
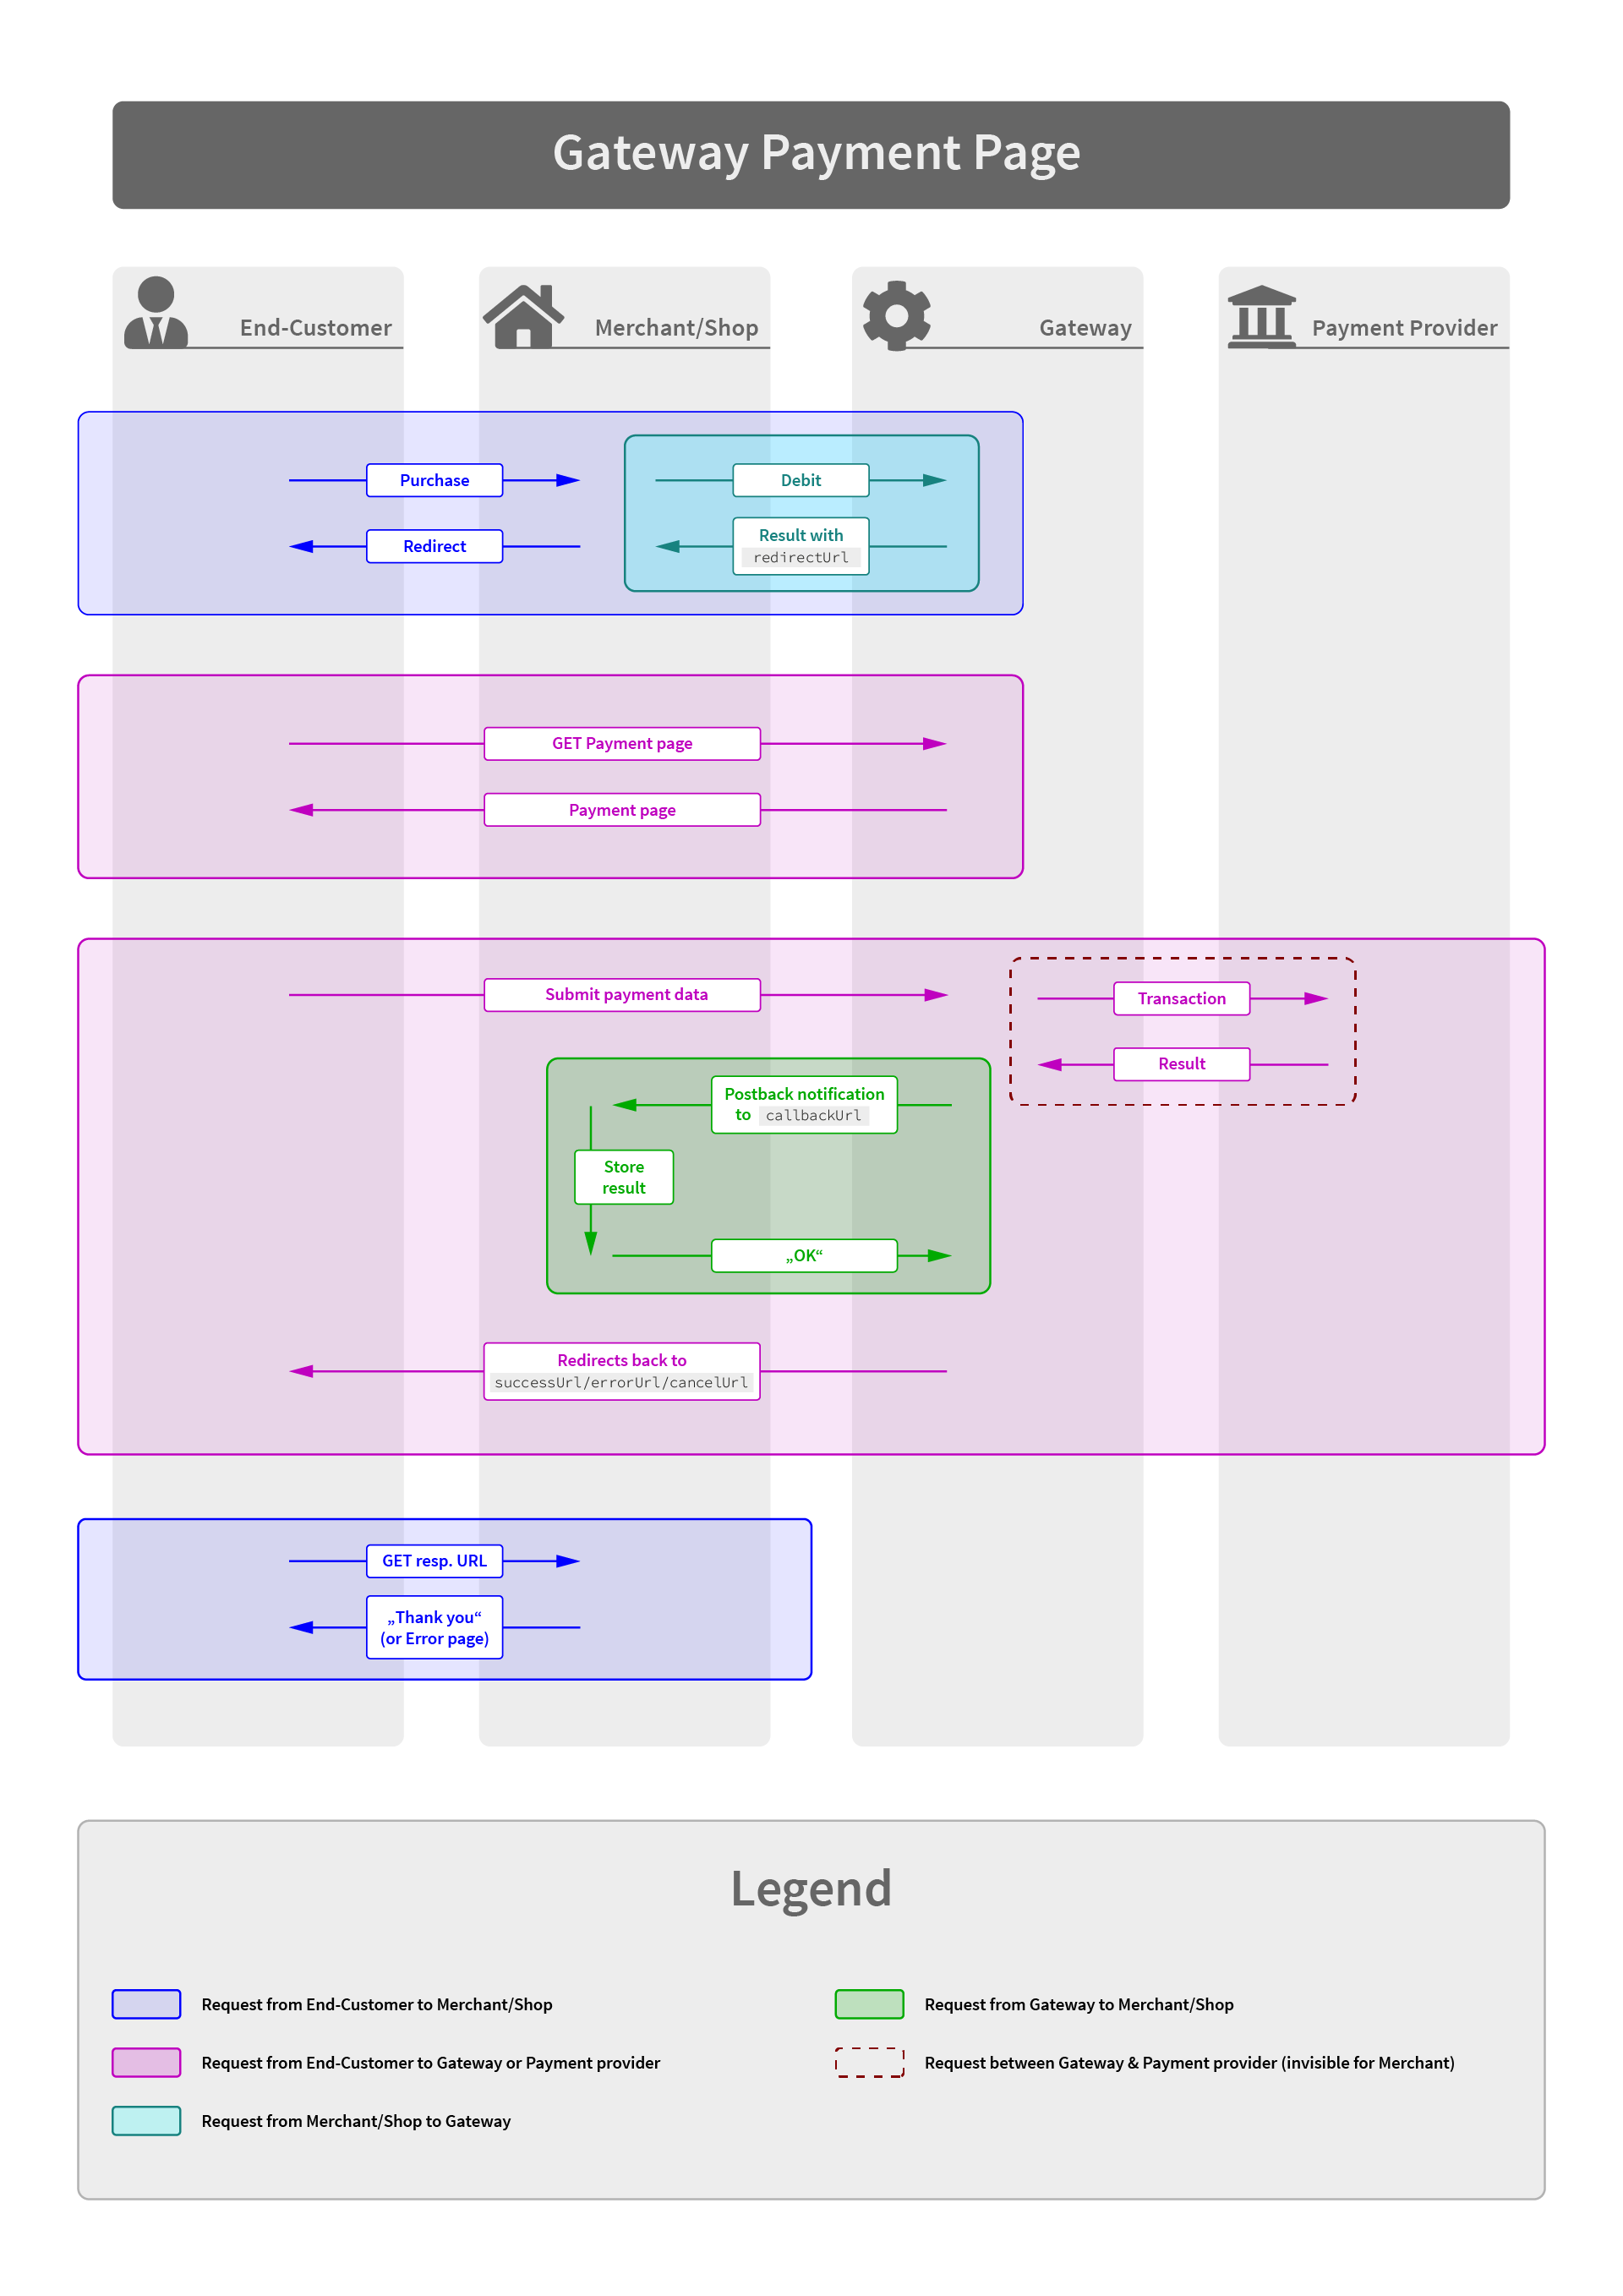
This flow requires you to embed an iFrame containing the payment form.
- Initiate the payment with the appropriate API call
- Upon success the Gateway answers with a result containing
returnType = REDIRECTand the url inredirectUrl(depending on the payment form setup it may also containredirectType = iframe) - You either redirect the user to the given URL (usually via a Location header) or embed and load the iFrame with the given URL
- The user completes the payment process on the payment page (or within the iFrame)
- The Gateway sends you an asynchronous Postback Notifications to the URL you provided in the initial API call
- The iFrame's content will load the
successUrlorerrorUrl(depending on the result) you provided in the initial API call. Or in the case of an embedded iFrame, the iFrame will load thesuccessUrlorerrorUrl(depending on the result). On that page you usually want to notify your top browser frame via JavaScript about the transaction result. Another approach is to let the success page break out of the iFrame.
Note: The top frame as well as the success/error page are served from the same domain. Some payment types may return a »PENDING« response, in such cases the user will be redirected to the successUrl. If 3-D Secure authentication is used, the customer will be redirected to their bank's authentication page.
Javascript Integration with payment.js
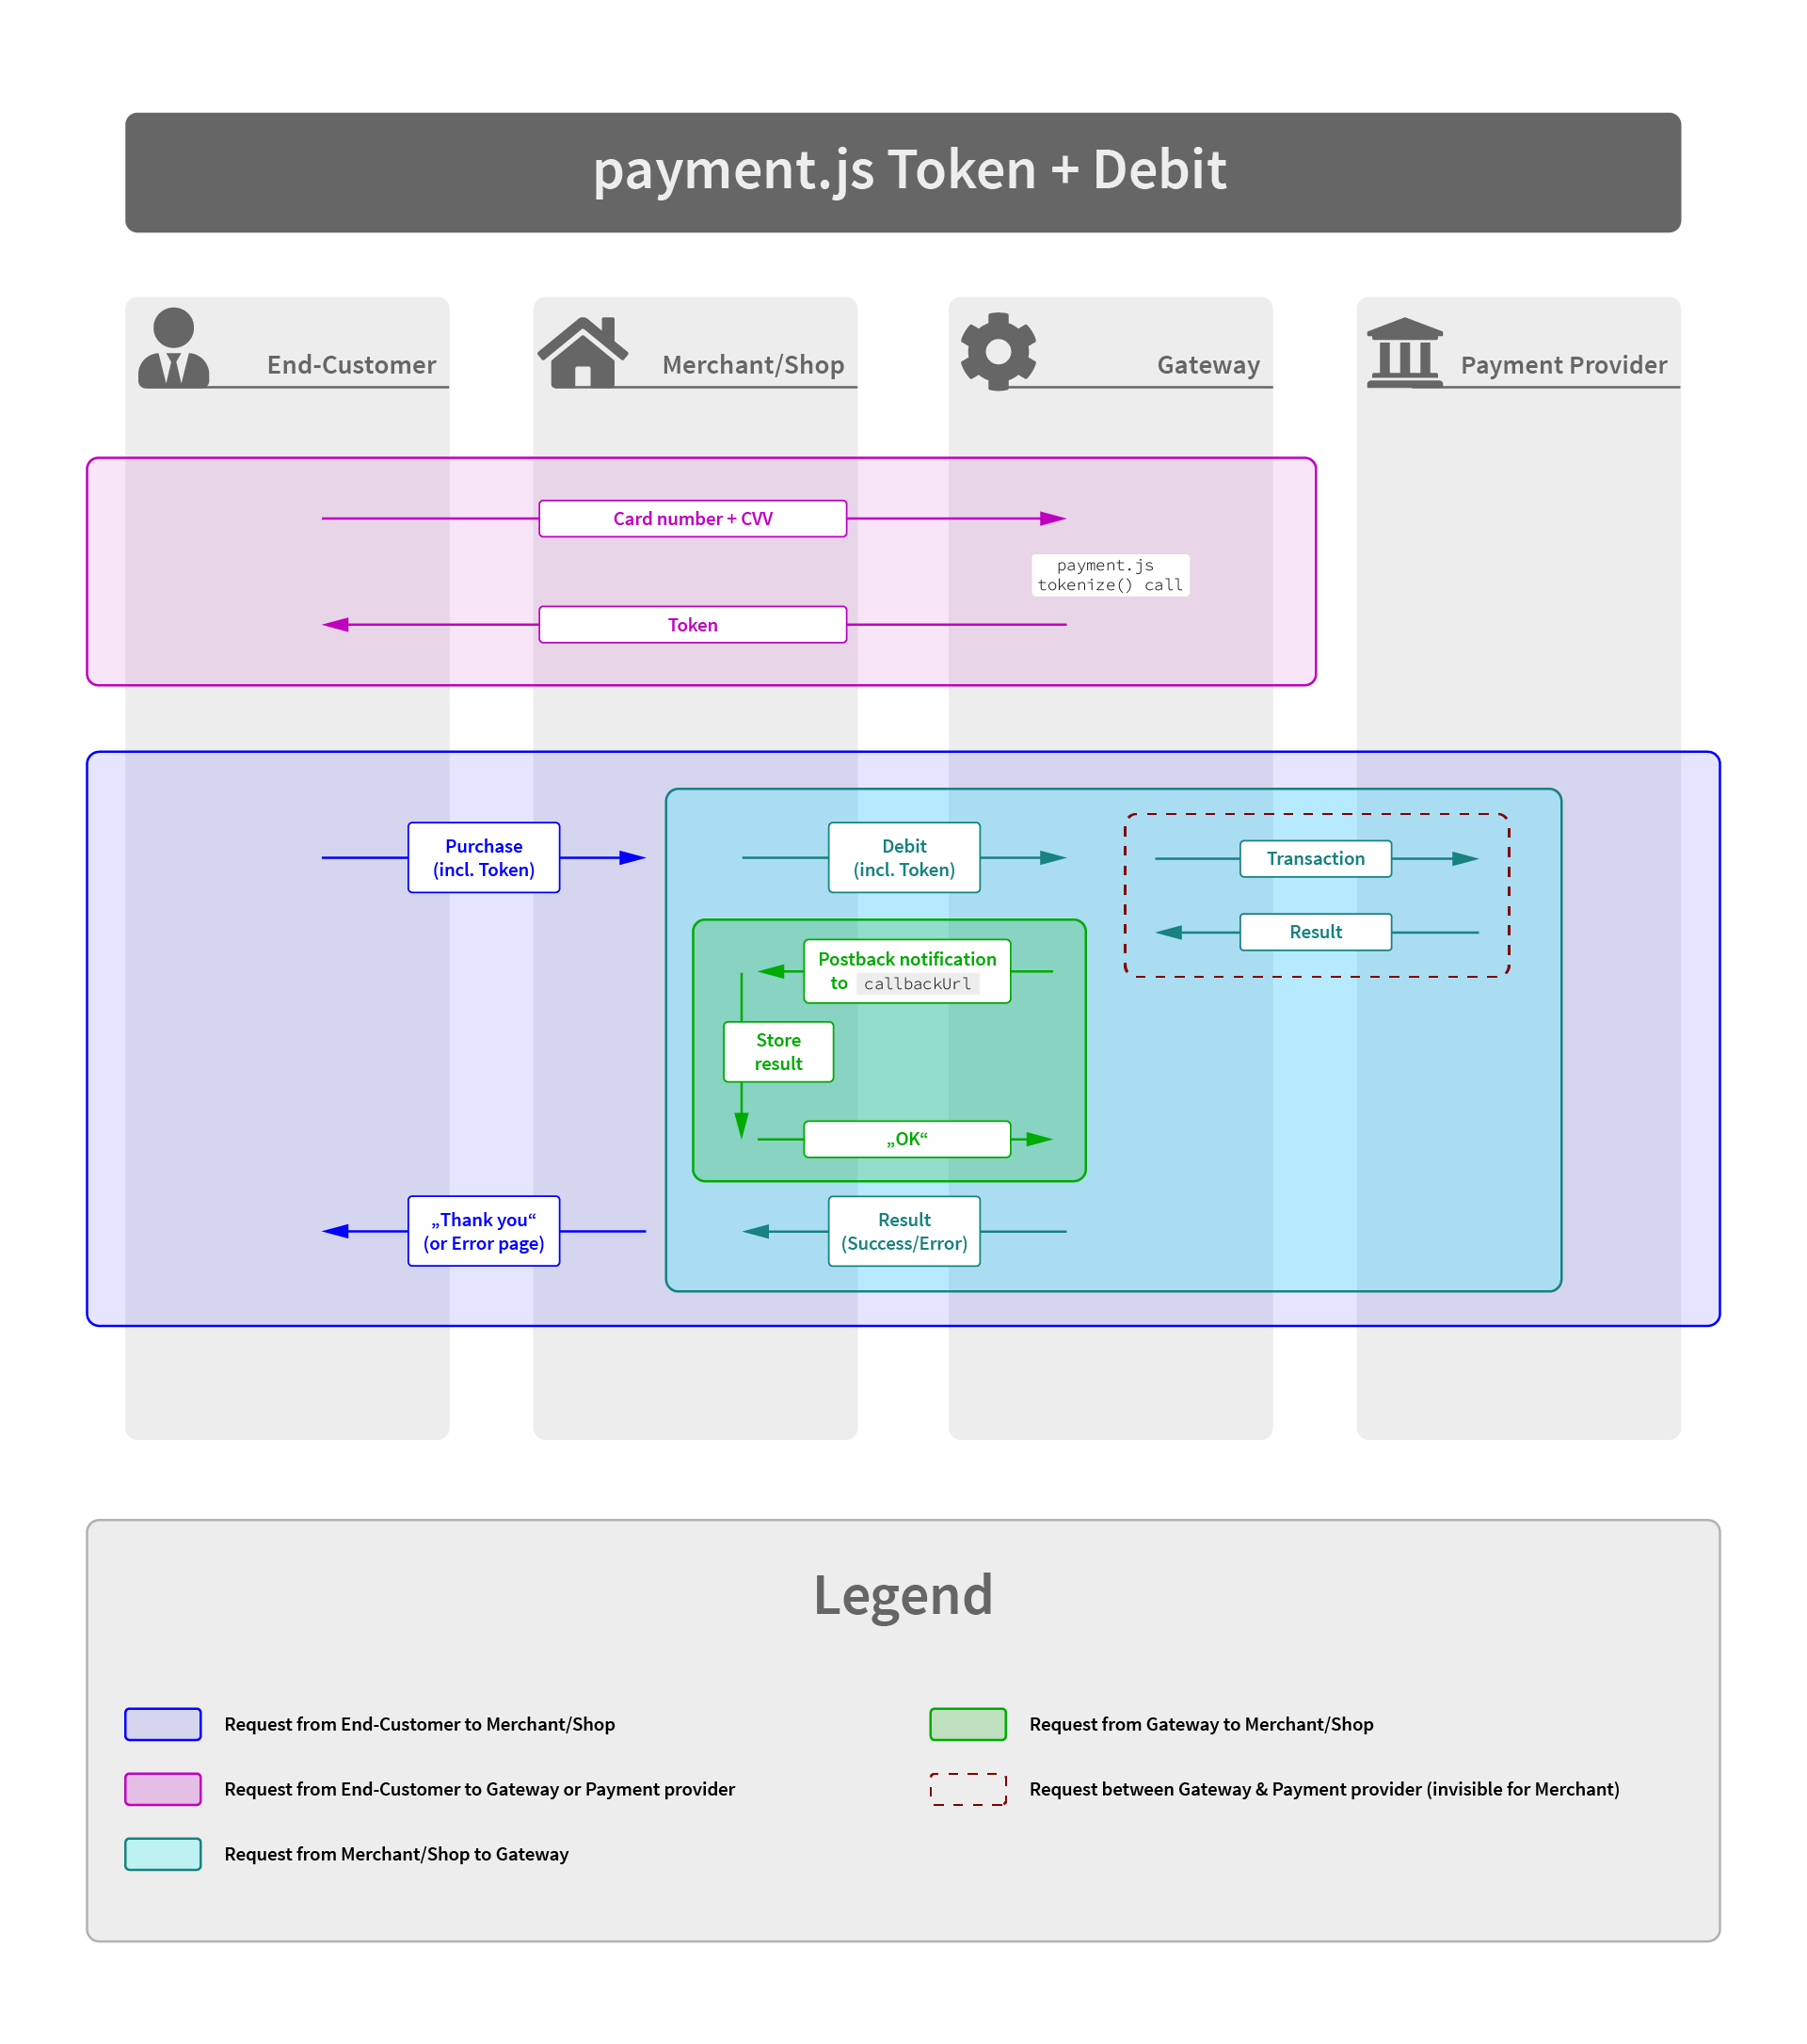
For most card payments (and payment methods with proprietary widgets, e.g. Amazon Payments) you're encouraged to integrate our payment.js Javascript Library. Using this approach most of the payment form will be served from your checkout page - which gives you full flexibility for styling and design. Only the sensitive fields for card number and CVV code are rendered within small iFrames served by our PCI-compliant infrastructure.
- Embed the payment.js library and initiate it as described in payment.js Javascript Integration
- Once you retrieved the payment token from the Javascript
tokenizecallback you submit your part of the payment form to your backend - Initiate the payment with the appropriate API call, passing the token in the field
transactionToken - The transaction gets processed immediately and the Gateway sends you an asynchronous Postback Notification to the URL you provided in the initial API call
- The Gateway answers your request containing the result. Depending on the transaction status this result will usually be
FINISHED,PENDINGorERROR.
Server-to-Server only
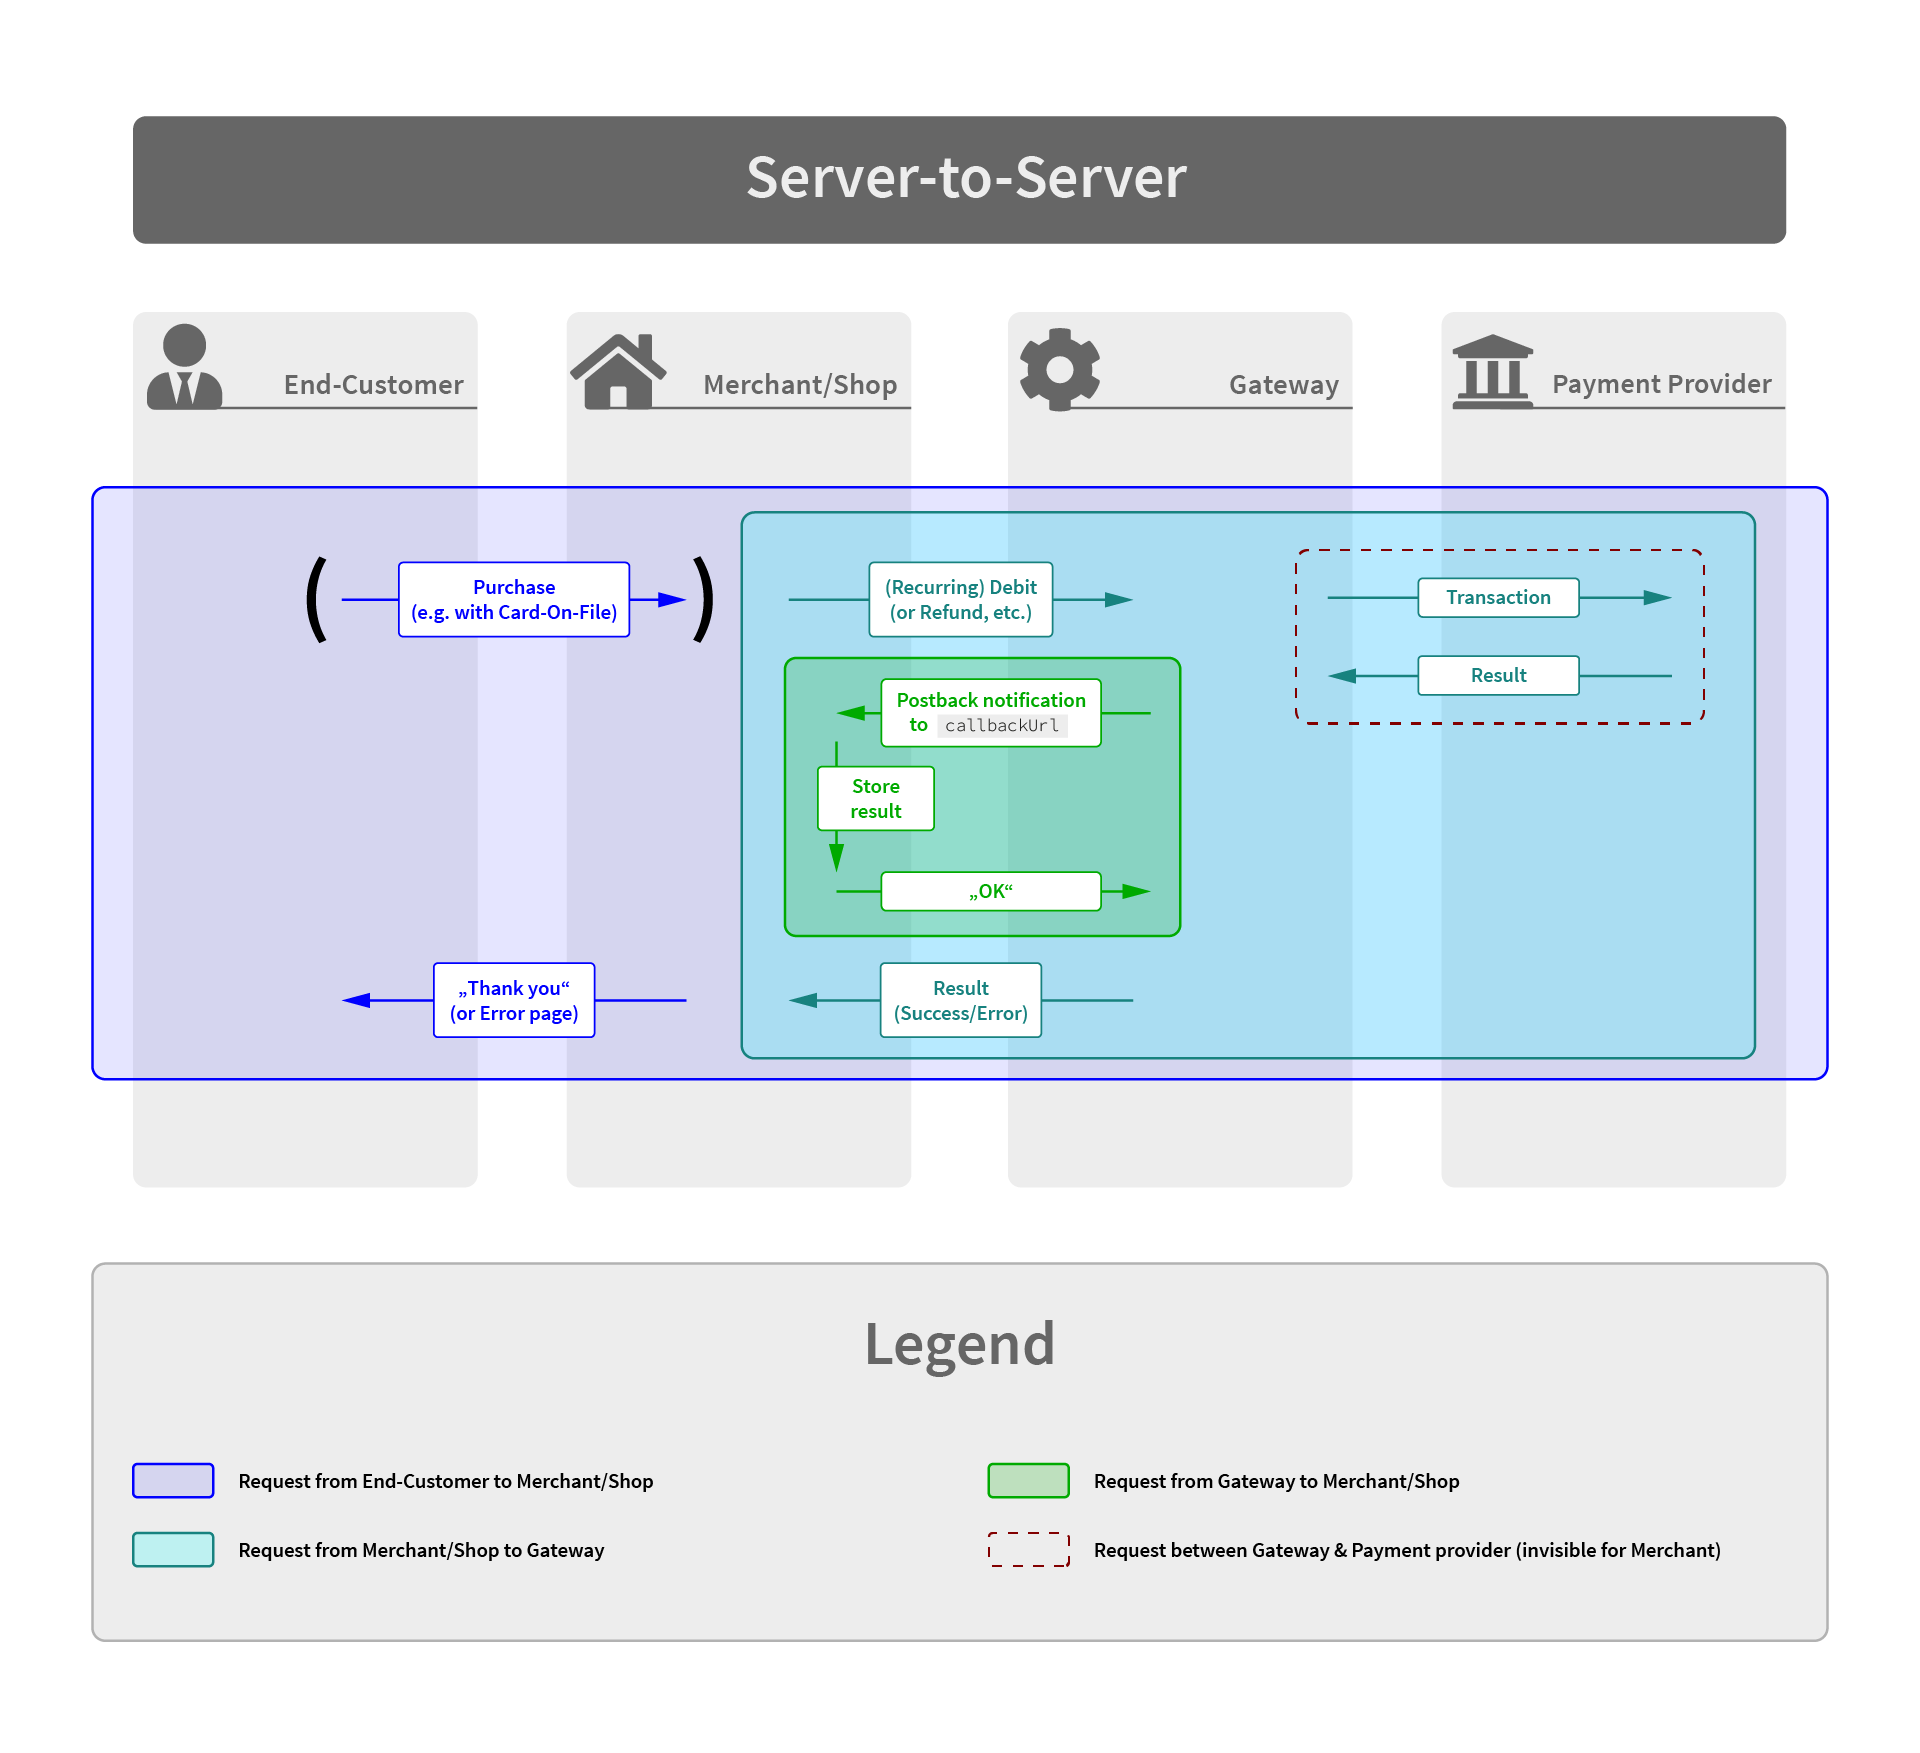
Some transactions just require some Server-to-Server communication, without involving the end-user directly into the payment process. Typical examples are: Recurring payments, Refunds, De-Registering of a payment method, Capture or Void of a previous preauthorization.
Furthermore, SEPA DirectDebit transactions can be performed using this way, as there is currently no requirement to collect IBAN and BIC in a PCI-compliant manner.
Note: This is subject to change depending on legal jurisdiction in various countries.
- Initiate the payment the appropriate API call, passing all relevant payment information.
- The transaction gets processed immediately and the Gateway sends you an asynchronous Postback Notification to the URL you provided in the initial API call
- The Gateway answers your request containing the result. Depending on the transaction status this result will usually be
FINISHED,PENDINGorERROR.
Transaction Types
The Gateway knows the following transactions types. Note: Depending on the connector some transaction types may not be available/supported.
- Debit: a "normal" payment. Debits the end customer with the given amount.
- Preauthorize: Reserves the payment amount on the customer's payment instrument.
- Capture: Completes a payment which was previously authorized with the Preauthorize method.
- Void: Cancels a previously performed Preauthorize
- Refund: Reverses a payment which was previously performed with Debit or Capture
- Payout: Credits the customer's account with the given amount
- Chargeback: a negative booking on the merchant's account which is triggered by the end customer
- Chargeback Reversal: reversal of a previous chargeback (usually when you won a chargeback dispute)
- Register: Registers a customer's payment instrument for future charges (see Recurring Transactions below)
- Deregister: Deletes a previously registered payment instrument.
Each transaction returns a unique ID ("UUID") which you should store within your database, as you may need it for further transactions.
Card-On-File and Recurring Transactions
For card-on-file or recurring transaction you have to set the withRegister flag on the first
transaction. By doing this the gateway and the payment provider will accept further
payments with reference to the first one.
For the recurring Debit or Preauthorize call you must set the
referenceTransactionId (XML) / referenceUuid (JSON) with the UUID of the first transaction.
Alternatively to the withRegister flag, you can use the Register transaction
type to just register a customer's payment instrument without charging it immediately.
Particularly for card payments you have to set the transactionIndicator in the
transaction's data to indicate the type of CoF or Recurring transaction.
Scenarios:
| Scenario | withRegister | transactionIndicator | Description | Example |
|---|---|---|---|---|
| One-Off Transaction, no card storage for further usage | false | none or SINGLE |
This marks a one-off transaction (without any subsequent transactions). | Cart Checkout without storing the card |
| First transaction, card is stored for subsequent Card-On-File payments (First CIT) | true | none or SINGLE |
This stores the card for subsequent Card-On-File payments | Cart Checkout, storing the card for further purchases |
| Card-On-File transaction, Customer-initiated (Subsequent CIT) | false | CARDONFILE |
This processes a CoF transaction with the stored card, initiated by the customer | Cart Checkout, using a previously stored card |
| Card-On-File transaction, Merchant-initiated (Subsequent MIT) | false | CARDONFILE-MERCHANT-INITIATED |
This processes an unscheduled merchant-initiated CoF transaction | Automated top-up or other billing by merchant |
| First transaction of a scheduled recurring series | true | INITIAL |
This marks the first transaction of a recurring series. | Customer subscribes to a monthly service |
| Subsequent transaction of a scheduled recurring series | false | RECURRING |
his is for subsequent transactions of a recurring series (e.g. subscriptions) | Monthly billing of a subscribed service |
| Mail or telephone order | false | MOTO |
Used when the card data are entered by a service agent, and not the customer itself | Call center purchase |
API Call
Now that you know which kind of transaction there are, you are encouraged to continue reading the API Reference Documentation
Asynchronous Status Notification
For every payment reaching a final status (successful or erroneous), the Gateway sends a notification XML to the callback URL defined in the transaction request.
Depending on the payment method this can either happen immediately or can take up to several days.
Your system must respond to this request with a HTTP status code "200" and the content "OK". If your response differs, the Gateway will continue to send the notification in increasing intervals.
Additionally, the Gateway will also send a notification in case of any new follow-up transactions or transaction status changes.
See the API Reference Documentation for detailed information about the notification XML.
Error Codes
Transactions which fail will always return an error code and an error message.
If the error is produced by any subsequent system (bank, PSP, PayPal etc.) the
error element will also contain the adapterCode and adapterMessage, reflecting
directly the response of those systems.
The error codes are structured in various groups, reflecting the phase when an error occurred.
General Errors & Validation Errors
| Code | Default Message | Description |
|---|---|---|
| 1000 | Request failed | Some fundamental error in your request |
| 1001 | Invalid response | The upstream system responded with an unknown response |
| 1002 | Invalid request data | Request data are malformed or missing |
| 1003 | Processing error | Transaction could not be processed |
| 1004 | Invalid signature | The request signature you provided was wrong |
| 1005 | Invalid XML | The XML you provided was malformed or invalid |
| 1006 | Logical error | Preconditions failed, e.g. capture on a failed authorize. |
| 1007 | Invalid configuration | Something is wrong with your configuration, please contact your integration engineer |
| 1008 | Unexpected system error | As said |
| 1009 | Too many requests | Rate limit has been exceeded |
| 1010 | System maintenance | The system is currently undergoing scheduled maintenance. Please try again later. |
| 9999 | Unknown error | We received an error which is not (yet) mapped to a better error code |
Payment Errors
| Code | Default Message | Description |
|---|---|---|
| 2001 | Account closed externally | The customer cancelled permission for his payment instrument externally |
| 2002 | User cancelled | Transaction was cancelled by customer |
| 2003 | Transaction declined | Transaction declined by upstream system/bank |
| 2004 | Quota regulation | Some limit reached |
| 2005 | Transaction expired | Customer took to long to submit his payment info |
| 2006 | Insufficient funds | Card limit reached |
| 2007 | Incorrect payment info | |
| 2008 | Invalid card | Card is invalid |
| 2009 | Expired card | |
| 2010 | Fraudulent card | |
| 2011 | Unsupported card | |
| 2012 | Transaction cancelled | |
| 2013 | Risk check block | |
| 2014 | Pickup card | |
| 2015 | Lost card | Card is claimed as lost |
| 2016 | Stolen card | |
| 2017 | IBAN invalid | |
| 2018 | BIC invalid | |
| 2019 | Customer data invalid | |
| 2020 | CVV required | |
| 2021 | 3D-Secure Verification failed | |
| 2022 | 3D-Secure Soft declined |
Status API Errors
| Code | Default Message | Description |
|---|---|---|
| 8001 | Transaction not found | No transaction was found for this specific connector determined by the apiKey |
Schedule API Errors
| Code | Default Message | Description |
|---|---|---|
| 7001 | schedule request is invalid | |
| 7002 | schedule request failed | |
| 7005 | scheduleAction is not valid | |
| 7010 | registrationId is required | |
| 7020 | registrationId is not valid | |
| 7030 | reference transaction not a register | The registrationId must point to a register or a debit-with-register or a preauthorize-with-register |
| 7035 | initial transaction is not a register | The transaction for starting a schedule must be a register, a debit-with-register or a preauthorize-with-register |
| 7036 | invalid initial period | The period between the initial and second transaction must be greater than 24 hours |
| 7040 | The scheduleId is not valid or does not match to the connector | |
| 7050 | The startDateTime is invalid or older than 24 hours | |
| 7060 | The continueDateTime is invalid or older than 24 hours | |
| 7070 | The status of the schedule is not valid for the requested operation |
Network Errors
| Code | Default Message | Description |
|---|---|---|
| 3001 | Timeout | |
| 3002 | Not Allowed | |
| 3003 | Temporary unavailable | |
| 3004 | Duplicate transaction ID | |
| 3005 | Communication error |
Post-Processing Errors
| Code | Default Message | Description |
|---|---|---|
| 4001 | Chargeback reverted | Chargeback was reverted |
| 4002 | Payment dispute | A dispute was filed, see the upstream system (e.g. PayPal) for details |
Scheduler
The Gateway's scheduler enables you to perform recurring debits without any further intervention. Based on the defined schedule it automatically triggers the recurring transactions and notifies you about the result.
Creating a Schedule
A schedule can be created along with an initial Register or Debit with Register
transaction, or can be attached to these kinds of transactions afterwards.
Note that if you send a Debit with a schedule attached to it, the initial Debit
will be performed immediately, and the first scheduled transaction will be
performed on the defined startDateTime of the schedule.
Schedule Intervals
In the schedule data you have to define the interval for the recurring transactions.
It consists of a periodUnit and a periodLength.
Example:
periodUnit = DAY and periodLength = 14 means the customer will be charged every 14 days with the defined amount.
The following interval units are allowed:
DAYWEEKMONTHYEAR
Schedule States
ACTIVE: this schedule is active and will perform recurring charges in the defined intervalPAUSED: this schedule is paused, and must be activated with thecontinueSchedulecall to continue recurring transactionsCANCELLED: this schedule is cancelled. You cannot reactivate a cancelled schedule, you have to send a newstartScheduleinstead.ERROR: if a recurring charge fails, the schedules changes to this status. You can retry an erroneous schedule by sending acontinueSchedulecall.
payment.js Javascript Integration
With the payment.js integration you can securely accept card payments and integrate card number and CVV collection directly into your shop website without the need for redirecting to a separate payment form. The payment.js library renders 2 separate iFrames for card number and CVV/CVC in your checkout page. This reduces your PCI-DSS scope to as low as it can get (PCI-DSS SAQ-A).
As a result of the JavaScript flow, you will receive a transactionToken,
identifying the customer's card, which you pass to the Transaction API request.
Step-By-Step Guide
1. On top of your HTML page (either in HEAD or directly after BODY), include the payment.1.3.min.js as shown here:
<script data-main="payment-js" src="https://gateway.dimoco-payments.eu/js/integrated/payment.1.3.min.js"></script>2. Build the payment form using inputs for all data, except card number and CVV/CVC code. For those two just build a DIV element with an ID, and provide these IDs to the payment.js init call.
Furthermore, you will want to add a hidden field for the transaction token you'll get from payment.js.
For successful payment processing, at least the following fields are required:
- Cardholder (or separate fields for First name & Last name)
- Expiration Month
- Expiration Year
<form id="payment_form" method="POST" action="someScript.php" onsubmit="interceptSubmit(); return false;">
  <input type="hidden" name="transaction_token" id="transaction_token"/>
  <div>
    <label for="first_name">First name</label>
    <input type="text" id="first_name" name="first_name"/>
  </div>
  <div>
    <label for="last_name">Last name</label>
    <input type="text" id="last_name" name="last_name"/>
  </div>
  <!-- OR -->
  <div>
    <label for="card_holder">Card holder</label>
    <input type="text" id="card_holder" name="card_holder"/>
  </div>
  <div>
    <label for="number_div">Card number</label>
    <div id="number_div" style="height: 35px; width: 200px;"></div>
  </div>
  <div>
    <label for="cvv_div">CVV</label>
    <div id="cvv_div" style="height: 35px; width: 200px;"></div>
  </div>
  <div>
    <label for="exp_month">Month</label>
    <input type="text" id="exp_month" name="exp_month"/>
  </div>
  <div>
    <label for="exp_year">Year</label>
    <input type="text" id="exp_year" name="exp_year"/>
  </div>
  <div>
    <label for="email">Email</label>
    <input type="text" id="email" name="email"/>
  </div>
  <div>
    <input type="submit" value="Submit"/>
  </div>
</form>3. Initialize the Payment.js library by instantiating a PaymentJs object, and call init() on it. The init method expects the connector's public integration key, id of div containing the credit card number, id of the CVV div, and a callback function as parameters. The callback function will receive the PaymentJs object, and you should call any further methods (formatting, event handlers) directly there (see Method reference).
<script>
  var payment = new PaymentJs();
  payment.init('public-integration-key', 'number_div', 'cvv_div', function (payment) {
    payment.setNumberStyle({
      'border': '1px solid red',
      'width': '150px'
    });
    payment.setCvvStyle({ ... });
    payment.numberOn('input', function () {
      alert('A number was entered');
    })
  });
</script>4. Once the user submits the form, you must intercept the submit event and call Payment.js' tokenize method, passing the additional data, a success callback and an error callback function.
The success callback receives the transaction token as string, you should store it and transmit it to your server together with the rest of the form. Additional data about the card itself will also be passed in the success callback.
The error callback function will receive an array with error objects, containing field name and error message.
/*
 This example assumes you have jQuery loaded for accessing DOM elements
*/

function interceptSubmit() {
  var data = {
    first_name: $('#first_name').val(),
    last_name: $('#last_name').val(),
    // OR card_holder: $('#card_holder').val(),
    month: $('#exp_month').val(),
    year: $('#exp_year').val(),
    email: $('#email').val()
  };
  payment.tokenize(
    data, //additional data, MUST include card_holder (or first_name & last_name), month and year
    function (token, cardData) { //success callback function
      $('#transaction_token').val(token); //store the transaction token
      $('#payment_form').get(0).submit(); //submit the form
    },
    function (errors) { //error callback function
      alert('Errors occurred');
      //render error information here
    }
  );
}
//error example
[
{
"attribute": "first_name",
"key": "errors.blank",
"message": "First name can't be blank"
}
]5. You can now call the Transaction API with the transaction token you acquired.
CVV Refreshing
If you already have tokenized a card and stored it via a Register or Debit/Preauthorize with Register transaction, all subsequent transaction will not pass CVC/CVV code to the acquiring bank, because the verification code must not be stored due to PCI regulations.
If you still want to perform card-on-file transactions with CVC/CVV code, you have to present the CVC/CVV input field to the customer again.
For refreshing the CVV you must have the referenceId of the initial transaction
stored in your customer details.
Furthermore, we recommend to store the last 4 digits of the card to let your
customer know, which card will be used for the payment.
Note: CVV Refresh call is not enabled for the dummy adapter
Use the CVV Refresh call as following:
1. On top of your HTML page (either in HEAD or directly after BODY), include the payment.1.3.min.js as shown here:
<script data-main="payment-js" src="https://gateway.dimoco-payments.eu/js/integrated/payment.1.3.min.js"></script>2. Build the payment form providing a DIV element with an ID for the CVV/CVC code input field.
<form id="payment_form" method="POST" action="someScript.php" onsubmit="interceptSubmit(); return false;">
  <div>
    <h1>Payment</h1>
    <p>Your purchase will be made with your stored credit card <b>**** **** **** 1111</b></p>
  </div>
  <div>
    <label for="cvv_div">CVV</label>
    <div id="cvv_div" style="height: 35px; width: 200px;"></div>
  </div>
  <div>
    <input type="submit" value="Submit"/>
  </div>
</form>3. Initialize the Payment.js library by instantiating an PaymentJs object, and call initCvvRefresh() on it. The method expects the connector's public integration key, referenceId of the initial transaction which was used to store the card, id of the CVV div and a callback function as parameters. The callback function will receive the PaymentJs object, and you should call any further methods (formatting, event handlers) directly there (see Method reference).
<script>
  var payment = new PaymentJs();
  payment.initCvvRefresh('public-integration-key', 'referenceTransactionId', 'cvv_div', function (payment) {
    payment.setCvvStyle({
      'border': '1px solid red',
      'width': '75px'
    });
    payment.cvvOn('input', function (data) {
      alert('A number was entered');
    });
  });
</script>4. Once the user submits the form, you must intercept the submit event and call Payment.js' refreshCvv method, passing a success callback and an error callback function.
The success callback will be called once the CVV was successfully updated for the card.
The error callback function will receive an array with error objects, containing field name and error message.
/*
 This example assumes you have jQuery loaded for accessing DOM elements
*/

function interceptSubmit() {
  payment.refreshCvv(
    function () { //success callback function
      $('#payment_form').get(0).submit(); //submit the form
    },
    function (errors) { //error callback function
      alert('Errors occured');
      //render error information here (see list of error codes below)
    }
  );
}
//error example
[
{
"attribute": "cvv",
"key": "errors.blank",
"message": "CVV code must not be empty"
}
]5. You can now call the Transaction API to perform the Debit/Preauthorize with CVV present.
payment.js Error codes
- Invalid Integration Key
{ attribute: 'integration_key', key: 'errors.configuration', message: 'Invalid Integration Key' } - System Error
{ attribute: 'integration_key', key: 'errors.system', message: 'System error occurred, please retry' } - Card number empty
{ attribute: 'number', key: 'errors.blank', message: 'Card number must not be empty' } - CVV/CVC Code empty
{ attribute: 'cvv', key: 'errors.blank', message: 'CVV code must not be empty' } - Invalid Card Number
{ attribute: 'number', key: 'errors.invalid', message: 'Invalid card number' } - Invalid CVV/CVC
{ attribute: 'cvv', key: 'errors.invalid', message: 'Invalid CVV code' } - Expiration month empty
{ attribute: 'month', key: 'errors.blank', message: 'Expiration month must not be empty' } - Expiration month invalid
{ attribute: 'month', key: 'errors.invalid', message: 'Invalid expiration month' } - Expiration year empty
{ attribute: 'year', key: 'errors.blank', message: 'Expiration year must not be empty' } - Expiration year invalid
{ attribute: 'year', key: 'errors.invalid', message: 'Invalid expiration year' } - Card expired
{ attribute: 'year', key: 'errors.expired', message: 'Card expired' } - Card Holder empty
{ attribute: 'card_holder', key: 'errors.blank', message: 'Card holder must not be empty' } - First Name empty
{ attribute: 'first_name', key: 'errors.blank', message: 'First name must not be empty' } - Last Name empty
{ attribute: 'last_name', key: 'errors.blank', message: 'Last name must not be empty' }
Method Reference
PaymentJs.init(publicIntegrationKey, numberDivId, cvvDivId, completeCallback)
Initializes the PaymentJs object, pass the connector's public integration key (provided to you together with your credentials), the ID of the DIVs which will contain the number and CVV code, and a completeCallback function. This function will receive the PaymentJs object as first argument.
PaymentJs.initCvvRefresh(publicIntegrationKey, referenceTransactionId, cvvDivId, completeCallback)
Initializes the PaymentJs object, pass the connector's public integration key (provided to you together with your credentials), the referenced transaction ID, the ID of the DIV which will contain the CVV code, and a completeCallback function. This function will receive the PaymentJs object as first argument.
PaymentJs.tokenize(additionalData, successCallback, errorCallback)
This submits the sensitive card information to the vaulting server.
additionalData is an object, may containing the following keys: first_name, last_name, month, year, email, phone_number, company, address1, zip, city, state, country
successCallback(token, cardData) will be called upon completion, receiving the token (as string) as first argument, and additional card data as second argument
// Example card data
{
  card_type: 'visa',
  full_name: 'John Smith',
  bin_digits: '41111111',
  first_six_digits: '411111',
  last_four_digits: '1111',
  month: '1',
  year: '2020',
  fingerprint: '46f7adfeb0a123fb8fcbfasdf6171asd6b3dfas44834c'
}
Possible card_type values are: amex, diners, discover, jcb, maestro, mastercard, uatp, unionpay, visa, visa_electron
errorCallback is called if an error occurs, containing error information (see above).
PaymentJs.refreshCvv(successCallback, errorCallback)
This submits the CVC/CVV code to the vaulting server.
successCallback will be called upon successful completion
errorCallback is called if an error occurs, containing error information (see above).
PaymentJs.initRiskScript(options, completeCallback)
Initialize Risk Scripts required for certain types of risk checks like the Kount risk check.
The first parameter should be an object including the type, e.g. { type: 'kount' },
completeCallback will be called upon successful completion
PaymentJs.setNumberStyle(styleObject)
Sets the style of the number field. The styleObject parameters should be an object with css properties, e.g.
{
  "border-color": "red",
  "font-size": "10px"
}
PaymentJs.setCvvStyle(styleObject)
Sets the style of the CVV field, for formatting see method above.
PaymentJs.setNumberPlaceholder(placeholderText)
Sets the placeholder text for the number input field
PaymentJs.setCvvPlaceholder(placeholderText)
Sets the placeholder text for the CVV input field
PaymentJs.numberOn(event, callbackFunction)
PaymentJs.cvvOn(event, callbackFunction)
Attach an event listener for the number or CVV input field, respectively. The callbackFunction will receive data about the event, e.g.
// Data Object
{
  cardType: 'visa',
  cvvLength: 3,
  numberLength: 12,
  validCvv: true,
  validNumber: true
}
Possible cardType values are: amex, diners, discover, jcb, maestro, mastercard, uatp, unionpay, visa, visa_electron
For details see event listening
PaymentJs.setRequireCardHolder(boolean)
With this you can disable the requirement of passing a card holder name within the additionalData object
PaymentJs.enableAutofill()
Enables the autofill handling, see description in chapter Auto-fill card data
PaymentJs.onAutofill(data)
Registers an event handler to receive auto filled data, see description in chapter Auto-fill card data
Deprecated Methods
PaymentJs.onNumberInput(callbackFunction)
PaymentJs.onCvvInput(callbackFunction)
Both functions are deprecated in favor of PaymentJs.numberOn('input', eventHandler)
and PaymentJs.cvvOn('input', eventHandler), respectively.
Event Listening
Both, number and CVV support listening for the following events:
inputfocusandblurmouseoverandmouseoutenterandesctabandshift-tab
For all events, the callback function will receive a data object.
var payment = new PaymentJs();
payment.init('public-integration-key', 'number_div', 'cvv_div', function (payment) {
  payment.numberOn('input', function (data) {
    // Handle input event
    console.log(data);
  });

  payment.numberOn('focus', function (data) {
    // Handle focus event
  });
});
// Example Output
{
cardType: 'visa',
cvvLength: 3,
numberLength: 12,
validCvv: true,
validNumber: true
}Possible cardType values are: amex, diners, discover, jcb, maestro, mastercard, uatp, unionpay, visa, visa_electron
Auto-fill Card Data
Most browsers and password managers support autofill of card data in payment forms. Since payment.js renders two iframes for the sensitive card data inputs (card number and CVV/CVC code) it requires special preparation to support the autofill feature.
Known Restrictions
Because the browser are autofilling all data only in one domain scope, the card number fields should be first in order on your payment form. This is the only way that payment.js can capture all data and passes them to you through the mechanism described below
How to Use
Once the complete handler of the init method is invoked, call the
enableAutofill method to turn it on.
Additionally, register a onAutofill handler to receive updates on the autofill event.
var payment = new PaymentJs();
payment.init('public-integration-key', 'number_div', 'cvv_div', function (payment) {
  payment.enableAutofill();
  payment.onAutofill(function (data) {
    /* data contains an object like this:
      data = {
        card_holder: "card holder name",
        month: 12,
        year: 2099
      }
      you should apply them to the input fields on your payment form.

      Example:
    */
    $('#field_id_of_cardholder').val(data.card_holder);
    $('#field_id_of_month').val(data.month);
    $('#field_id_of_year').val(data.year);
  });
});
Advanced form Styling
Using PaymentJs.setNumberStyle()/PaymentJs.setCvvStyle() in
combination with event listening allows styling the input fields similar to the
rest of your forms.
While the PaymentJs provides the most seamless integration for a shop, it has one limitation due to PCI requirements: external resources most not be loaded. Due to this constraint, it is not possible to load external fonts or background images.
var payment = new PaymentJs();
payment.init('public-integration-key', 'number_div', 'cvv_div', function (payment) {
  var numberFocused = false;
  var cvvFocused = false;
  var style = {
    'border': '3px solid gray',
  };
  var hoverStyle = {
    'border': '3px solid blue',
  };
  var focusStyle = {
    'border': '3px solid green',
  };

  // Set the initial style
  payment.setNumberStyle(style);
  payment.setCvvStyle(style);

  // Focus events
  payment.numberOn('focus', function () {
    numberFocused = true;
    payment.setNumberStyle(focusStyle);
  });
  payment.cvvOn('focus', function () {
    cvvFocused = true;
    payment.setCvvStyle(focusStyle);
  });

  // Blur events
  payment.numberOn('blur', function () {
    numberFocused = false;
    payment.setNumberStyle(style);
  });
  payment.cvvOn('blur', function () {
    cvvFocused = false;
    payment.setCvvStyle(style);
  });

  // Hover events
  payment.numberOn('mouseover', function () {
    // Don't override style if element is already focused
    if (!numberFocused) {
      payment.setNumberStyle(hoverStyle);
    }
  });
  payment.numberOn('mouseout', function () {
    // Don't override style if element is already focused
    if (!numberFocused) {
      payment.setNumberStyle(style);
    }
  });
  payment.cvvOn('mouseover', function () {
    // Don't override style if element is already focused
    if (!cvvFocused) {
      payment.setCvvStyle(hoverStyle);
    }
  });
  payment.cvvOn('mouseout', function () {
    // Don't override style if element is already focused
    if (!cvvFocused) {
      payment.setCvvStyle(style);
    }
  });
});
Styling Input Placeholders
Styling placeholders of number and cvv inputs needs you to add a special style
value ::placeholder. The provided JavaScript code demonstrates how to apply
styling to the placeholder of a number input. In this case, the text color of
the placeholder is set to #a00 (a shade of red).
payment.setNumberStyle({
'::placeholder': {
'color': '#a00',
}
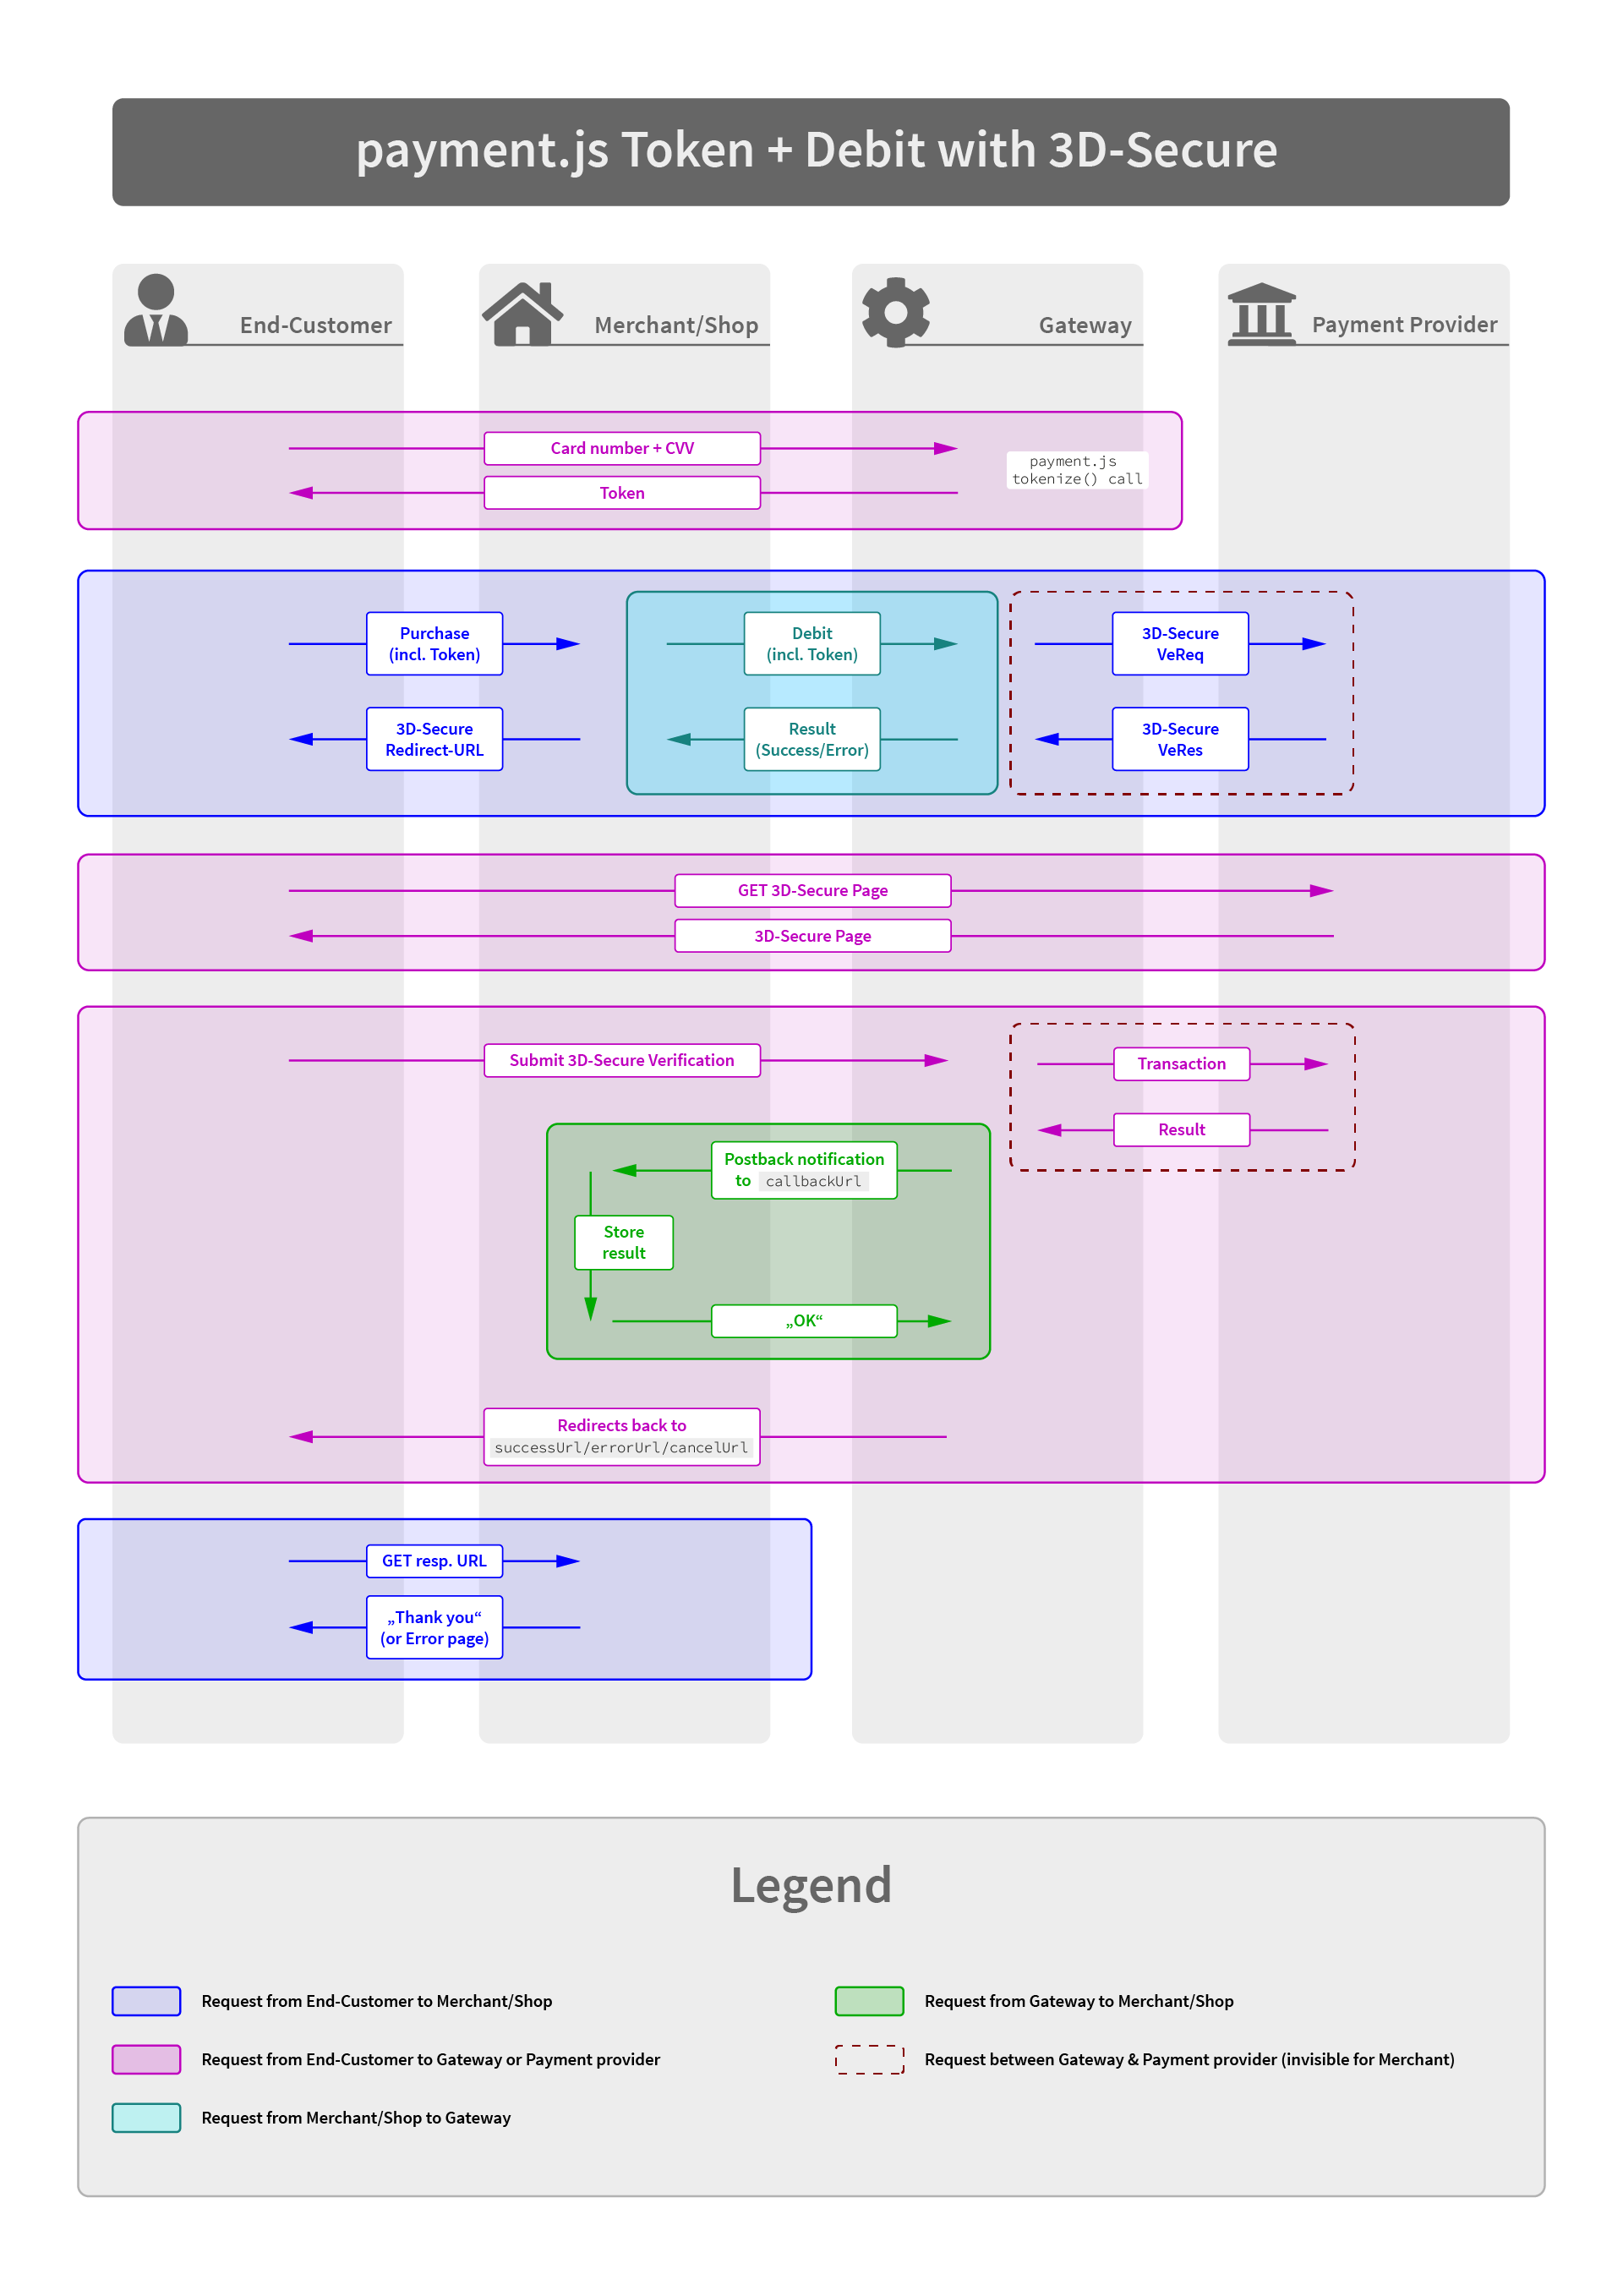
});3D-Secure Authentication
Introduction
Depending on your configuration you may be eligible to use 3D Secure authentication for card transactions. Your integration engineer will tell you, which version is applicable for you.
3D Secure 2.x
The 3D Secure 2.x protocol facilitates a lot more options to identify your customer.
Generally there are 2 possible authentication flows available:
- Frictionless flow
- Challenge flow
Depending on the data provided, the card issuing bank determines which flow to apply. In the frictionless flow no further customer interaction is required, in the challenge flow the customer will be redirected to its bank's authentication page.
The Gateway automatically handles any necessary data exchanges and redirects. The transaction response will only ask your system once to redirect the customer.
To improve your chances to apply for the frictionless flow, you should transmit as many 3D Secure related data as you have.
Refer to 3D-Secure 2.x Fields for detailed field documentation.
Transaction-based Activation
Some connectors support 3D-Secure Payer Authentication (i.e. "Verified by Visa", "MasterCard SecureCode").
If your setup allows you to decide whether to activate 3D-Secure or not, you can control it via an extraData key/value pair in the transaction request. Alternatively it might also be enabled based on your risk profile.
The following three values are possible:
| Value | Description |
|---|---|
| OFF | 3D-Secure Verification is turned off. It can still occur that the Verification gets enabled by certain risk parameters. |
| OPTIONAL | If the payer is enrolled into 3D-Secure program, the verification will be performed. If not, the transaction will still be processed. |
| MANDATORY | If 3D-Secure verification is not possible (e.g. Payer not enrolled, Server not reachable), the transaction will be declined. |
The extraData element must have the key "3dsecure".
<extraData key="3dsecure">MANDATORY</extraData>$debit->addExtraData('3dsecure', 'MANDATORY');Testing Connector
The testing connector is provided for you by your integration engineer to test your implementation against the various possible transaction flows and results of the gateway.
Depending on your configuration, not all transaction types may be available and therefore may not need to be supported by you.
Card Testing
You can use the following card numbers for testing:
| Brand | Number | Result |
|---|---|---|
| Visa | 4111 1111 1111 1111 | Success |
| Visa | 4242 4242 4242 4242 | Failure |
| Mastercard | 5555 5555 5555 4444 | Success |
| Mastercard | 5105 1051 0510 5100 | Failure |
| Diners | 3800 000000 0006 | Success |
| Amex | 3782 8224631 0005 | Success |
SEPA DirectDebit Testing
You can use any IBAN you like.
The last four digits will control the result:
| Last 4 digits | Result |
|---|---|
| 1111 | Success |
| 2003 | Transaction Declined |
| 2006 | Insufficient funds |
Example:
AT00 0000 0000 0000 1111-> Successful transaction
Dummy Testing
For any other payment methods there is a generic Dummy method, which always requires you to redirect the browser to the given redirectUrl.
On the payment page you can then choose the desired result.
Test Scenarios
Depending on the data you submit with the transaction, the result will either be reported directly, or you will have to forward the browser to the redirectUrl.
Card Payments
If you acquire a token through the payment.js integration, and submit this
token within the transactionToken field of the transaction, the result will
directly contain a success or failure (depending on the card number)
Exception:
If you submit an OPTIONAL or MANDATORY 3D-Secure authentication parameter,
you will get a redirectUrl to the 3D-Secure Simulator.
If you don't send a transactionToken you will always get a redirectUrl to the Simulator's payment page.
SEPA DirectDebit
If you send an IBAN as described above within the transaction data
(ibanCustomer.iban), you will directly get a success or failure
result (depending on the IBAN).
If you don't submit an IBAN, you will always get a redirectUrl to the Simulator's payment page.
SEPA Credit Transfer
For SEPA Credit Transfer you have to send a payout transaction containing
the receiver's IBAN in the ibanCustomer.iban element (similar to SEPA DirectDebit).
Apple Pay
Apple Pay is not an adapter itself, but a common type of payment supported by some listed adapters.
Prerequisites
For processing transactions with Apple Pay tokens, the Gateway has to be configured with your Payment Processing certificate first. Please ask your Gateway administrator to do so.
Instruction on how to acquire this certificate can be found directly in the Apple documentation: https://developer.apple.com/documentation/apple_pay_on_the_web/setting_up_your_server
Transaction Processing
For Apple Pay transactions acquire a Payment Token through your iOS App, or Apple Pay on the Web. (Refer to https://developer.apple.com/documentation/passkit & https://developer.apple.com/documentation/apple_pay_on_the_web).
The resulting token must be submitted in the transactionToken element of the Debit/Preauthorize, prefixed with applepay:
Example:
<transactionToken>
  applepay:{"token":{"paymentData":{"version":"EC_v1","data":"...","signature":"...","publicKeyHash":"...","transactionId":"...."}},"paymentMethod":{"displayName":"Some card","network":"MasterCard","type":"debit"},"transactionIdentifier":"..."}}
</transactionToken>
GooglePay™
GooglePay is not an adapter itself, but a common type of payment supported by some listed adapters.
Only GooglePay protocol version 2 (ECv2) is supported.
Prerequisites
You can use GooglePay in your Android app or on your website.
To integrate GooglePay in your Android app please refer to the following links:
- Google Pay Android developer documentation
- Google Pay Android integration checklist
- Google Pay Android brand guidelines
To integrate GooglePay in your website please refer to the following links:
- Google Pay Web developer documentation
- Google Pay Web integration checklist
- Google Pay Web brand guidlines
Transaction Processing
For GooglePay transactions acquire a Payment Token through your Android app, or on your website.
Use the following parameters when sending a request to Google and replace
YOUR_MERCHANT_ID with the GUID of your merchant:
gateway = "YOUR_GATEWAY_PARAMETER"
gatewayMerchantId = "YOUR_MERCHANT_ID"
If you are unsure about your gateway parameter, please contact your account manager.
The resulting token must be submitted in the transactionToken element of the
Debit/Preauthorize, prefixed with googlepay:
Example XML:
<transactionToken>
  googlepay:{"signature":"...","intermediateSigningKey":{"signedKey":"{\"keyValue\":\"...\",\"keyExpiration\":\"...\"}","signatures":["..."]},"protocolVersion":"ECv2","signedMessage":"{\"encryptedMessage\":\"...\",\"ephemeralPublicKey\":\"...\",\"tag\":\"...\"}"}
</transactionToken>
Example JSON:
{
  "transactionToken": "googlepay:{\"signature\":\"...\", ...}\"}",
  ...
}
Card Parameters
A billing address is not required for processing transactions, therefore no billing address parameters need to be given with a card.
Supported Card Authentication Methods
PAN_ONLYCRYPTOGRAM_3DS
Supported Card Networks
AMEXDISCOVERINTERACJCBMASTERCARDVISA